DuplicateFinder User Manual
v1.0 · Windows 10 / 11
DuplicateFinder scans any folder—or an entire drive—for duplicate files, groups them by content, and proposes a safe merge plan that moves copies into the folder that already holds the most files, then recycles the leftovers. Nothing is deleted permanently until you review and confirm.
Key capabilities:
- 4-stage detection pipeline — hard-link check → size filter → partial hash → full content hash. Eliminates ~99 % of candidates before reading the full file.
- Persistent hash cache — re-scans of large folders complete in seconds by reusing USN-verified hashes from a previous run.
- Safe deletion — duplicates are moved to the Recycle Bin (not permanently deleted), and a dry-run mode lets you preview every planned move before committing.
- Background operation — runs overnight via system tray, survives screen lock, and sends a Windows toast notification when done.
System Requirements
| Operating system | Windows 10 (1903+) or Windows 11 |
|---|---|
| Architecture | x64 (64-bit) |
| RAM | 4 GB minimum, 8 GB recommended for drives > 500 GB |
| Disk space | ~60 MB for the application + cache folder in %APPDATA% |
| Internet | Required at first activation and every 7 days for token renewal |
| Permissions | Read access to the folders you want to scan; write access to move/delete duplicates |
Installation & Activation
Installing
- Download DuplicateFinderSetup.zip from the download page or your purchase confirmation email.
- Extract the ZIP and run
DuplicateFinderSetup.exe. - Follow the installer prompts. A shortcut is placed on your Desktop and Start Menu.
Activating your licence
- Launch DuplicateFinder. The Activation dialog opens automatically on first run.
- Paste your purchase key (format:
XXXXX-XXXXX-XXXXX-XXXXX-XXXXX) from the confirmation email. - Click Activate. The app contacts the activation server, verifies the key, and stores a signed licence token on your machine.
- On success the dialog closes and the main window opens.
One machine per key
Each licence key activates a single machine. To move to a new PC, open Help → Deactivate this machine on the old one, then run the activation wizard on the new machine with the same key. If the old machine is unavailable, contact support@azideasolutions.com to release the activation manually.
Running DuplicateFinder on several machines at once? Buy one key per machine — you can purchase multiple keys in a single order on the Buy page.
Setup: Folders & File Types
Configure what to scan before starting.
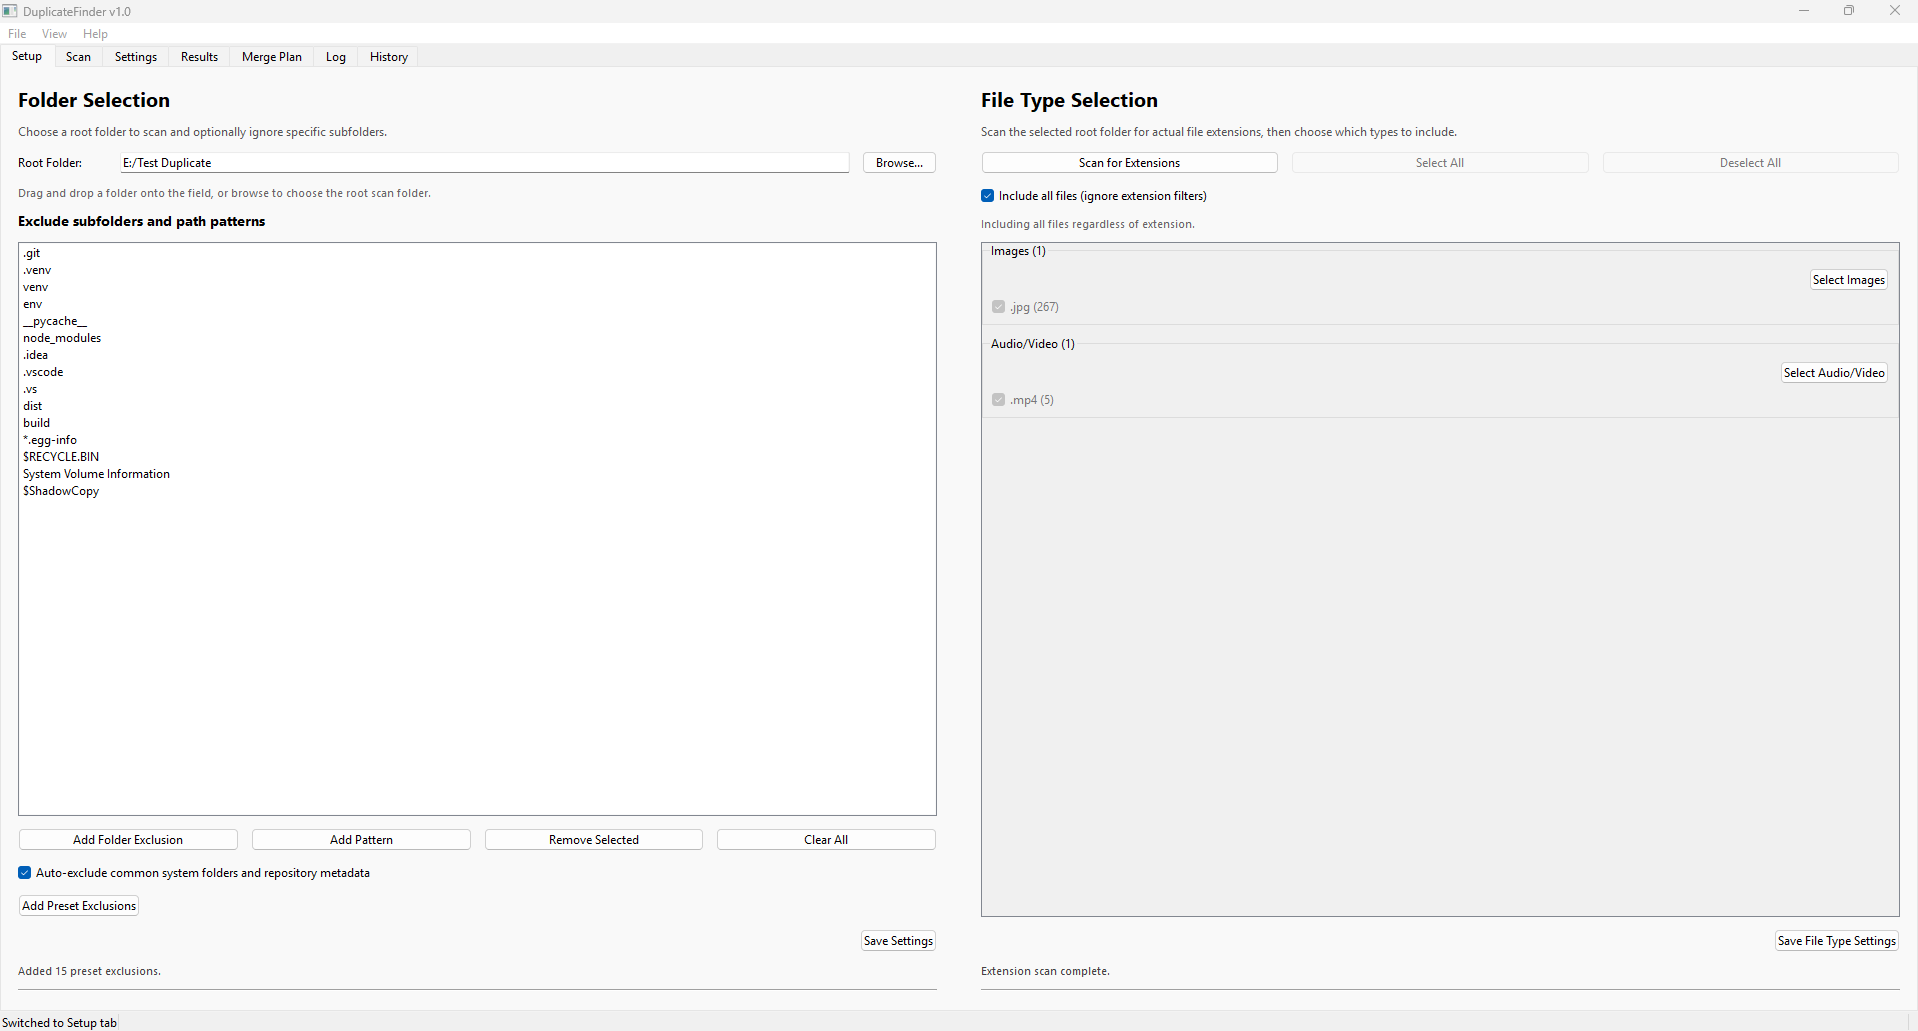
Adding root folders
- Click Add Folder and browse to any folder, external drive, or UNC path.
- Add as many root folders as you like; the scan covers all of them together, so duplicates across different drives are found.
Excluding subfolders
- Click Add Exclusion to skip a subfolder (e.g.
node_modules,.git,Windows\System32). - Exclusions are matched anywhere in the path, so adding
node_modulesskips it everywhere without specifying each project individually.
File-type filters
Tick the categories you want scanned. Limiting to a single category (e.g. Images) drastically reduces scan time on large drives.
| Category | Typical extensions |
|---|---|
| Images | .jpg .jpeg .png .heic .gif .bmp .tiff .webp .raw |
| Video | .mp4 .mov .avi .mkv .wmv .m4v .hevc |
| Audio | .mp3 .flac .aac .wav .m4a .ogg |
| Documents | .pdf .docx .xlsx .pptx .txt .odt |
| Archives | .zip .7z .rar .tar .gz .bz2 |
| All files | (no filter — every file is checked) |
Scanning
How the 4-stage pipeline works.
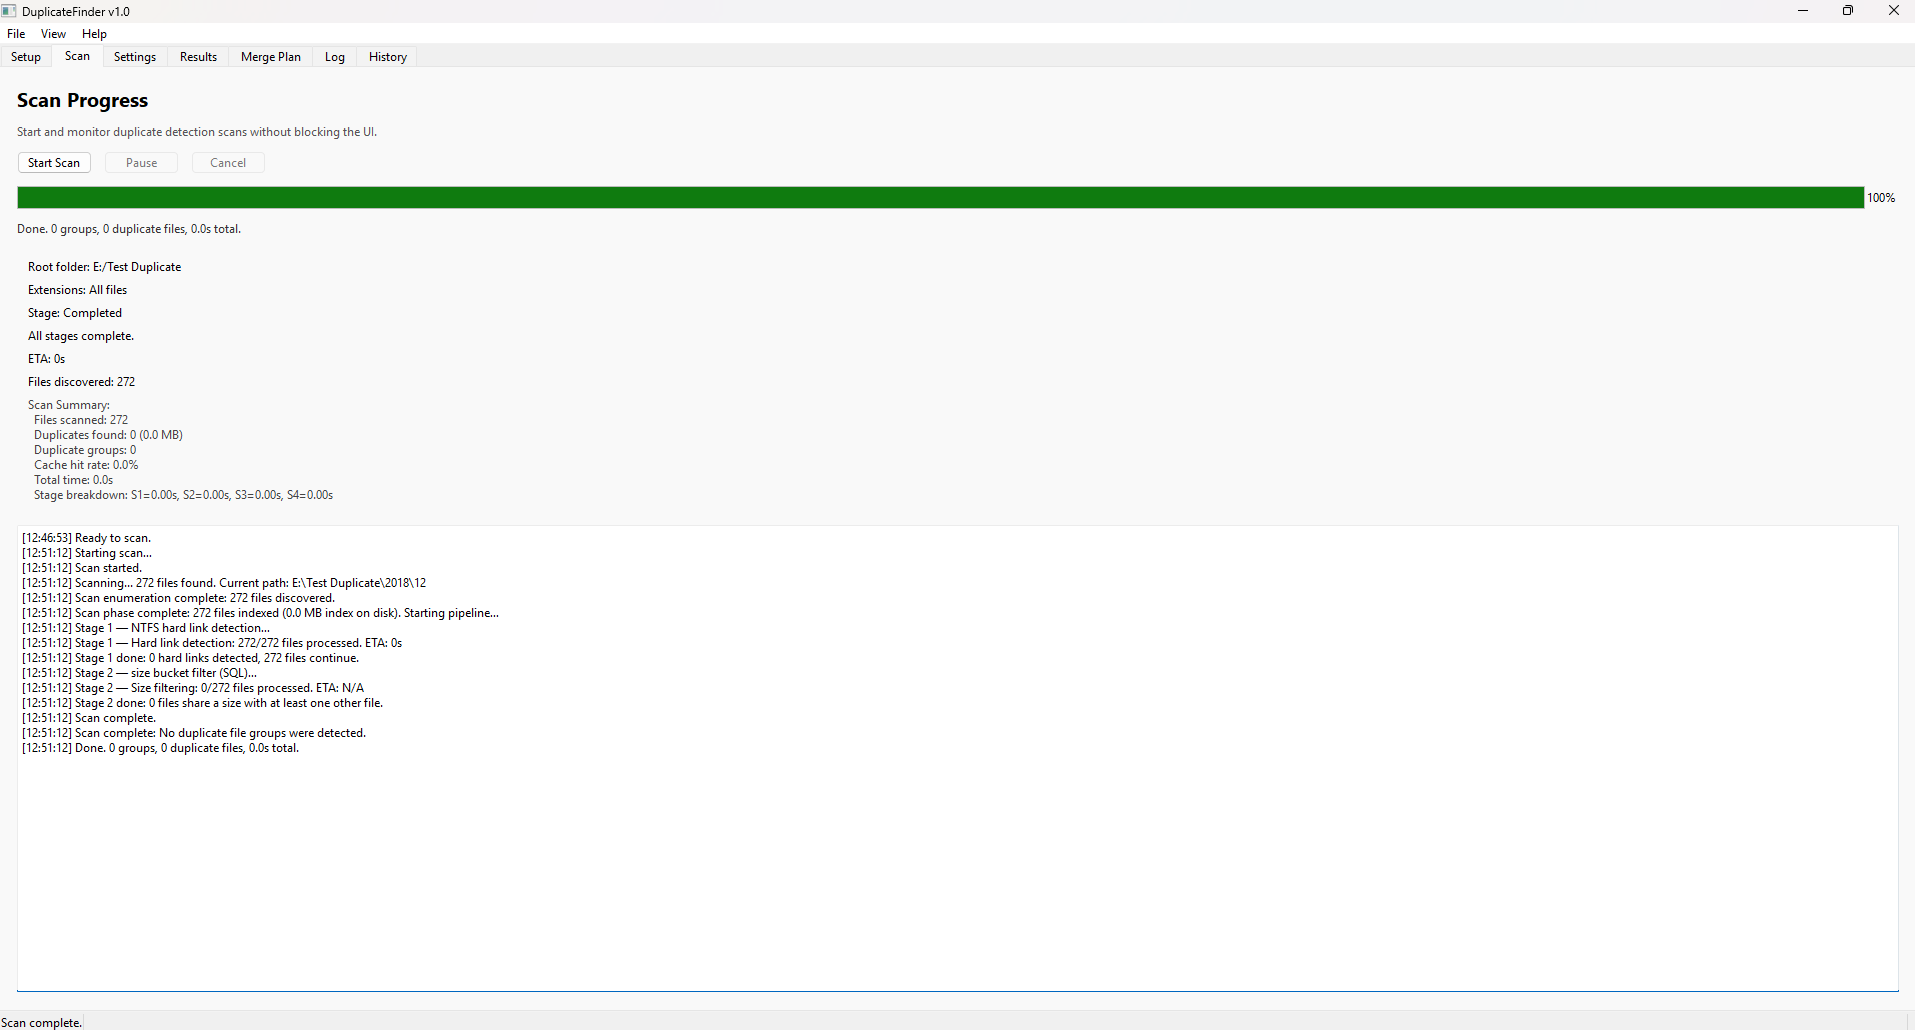
Starting a scan
Click Start Scan on the Scan tab. The scan runs on a background thread so the UI remains responsive. You can browse previous results while a new scan is in progress.
The 4-stage pipeline
- Hard-link check — files that share the same inode (NTFS hard links) are grouped immediately without hashing.
- Size filter — files with a unique size cannot have a duplicate; they are removed from consideration instantly.
- Partial hash — only the first 64 KB of each candidate file is hashed. Files that differ in the first 64 KB are eliminated.
- Full content hash — the remaining candidates are fully hashed (MD5 by default; SHA-256 configurable). Files with identical full hashes are confirmed duplicates.
The progress bar shows which stage is running. The stats strip updates in real-time: Files scanned, Duplicate groups found, and Reclaimable space.
Pause and Cancel
- Pause — suspends I/O immediately; resume at any time.
- Cancel — stops the scan and discards partial results.
Settings
Tune performance and behaviour.
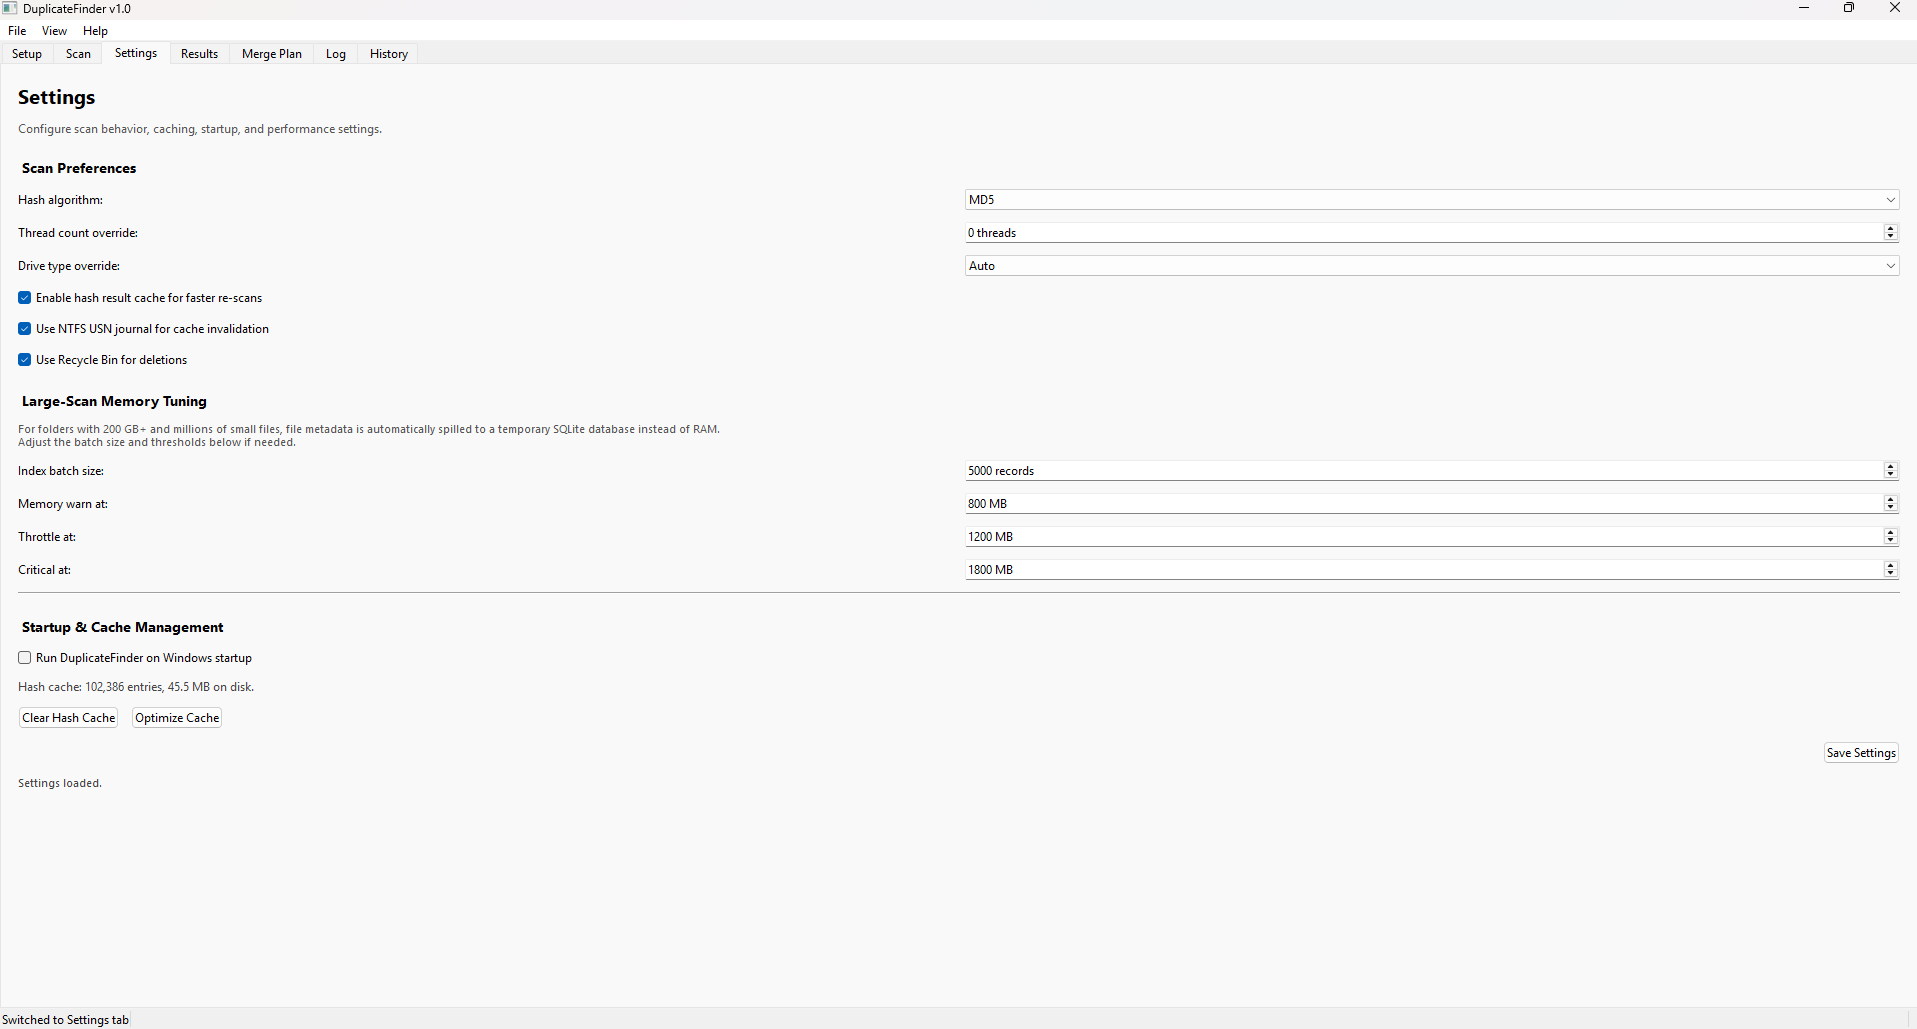
| Setting | Description |
|---|---|
| Thread count | Number of parallel hasher threads. Default: number of logical CPU cores. Lower this if you need the machine responsive during scanning. |
| Memory limit (MB) | Maximum RAM used for file buffers. Reduce on low-memory machines or when scanning many large video files simultaneously. |
| Hash algorithm | MD5 (default, fast) or SHA-256 (slower but collision-resistant). For most duplicate-finding tasks MD5 is fine. |
| Minimum file size | Skip files smaller than this size (default: 1 KB). Useful to ignore
small stub files like .ini or .db. |
| Scheduled scan | Enable to run a scan automatically on a schedule (daily/weekly). Uses Windows Task Scheduler; requires the app to be installed. |
| Log level | Info (default), Debug, or Warning. Debug emits detailed per-file events useful for troubleshooting. |
Reviewing Results
Inspect every duplicate group before acting.
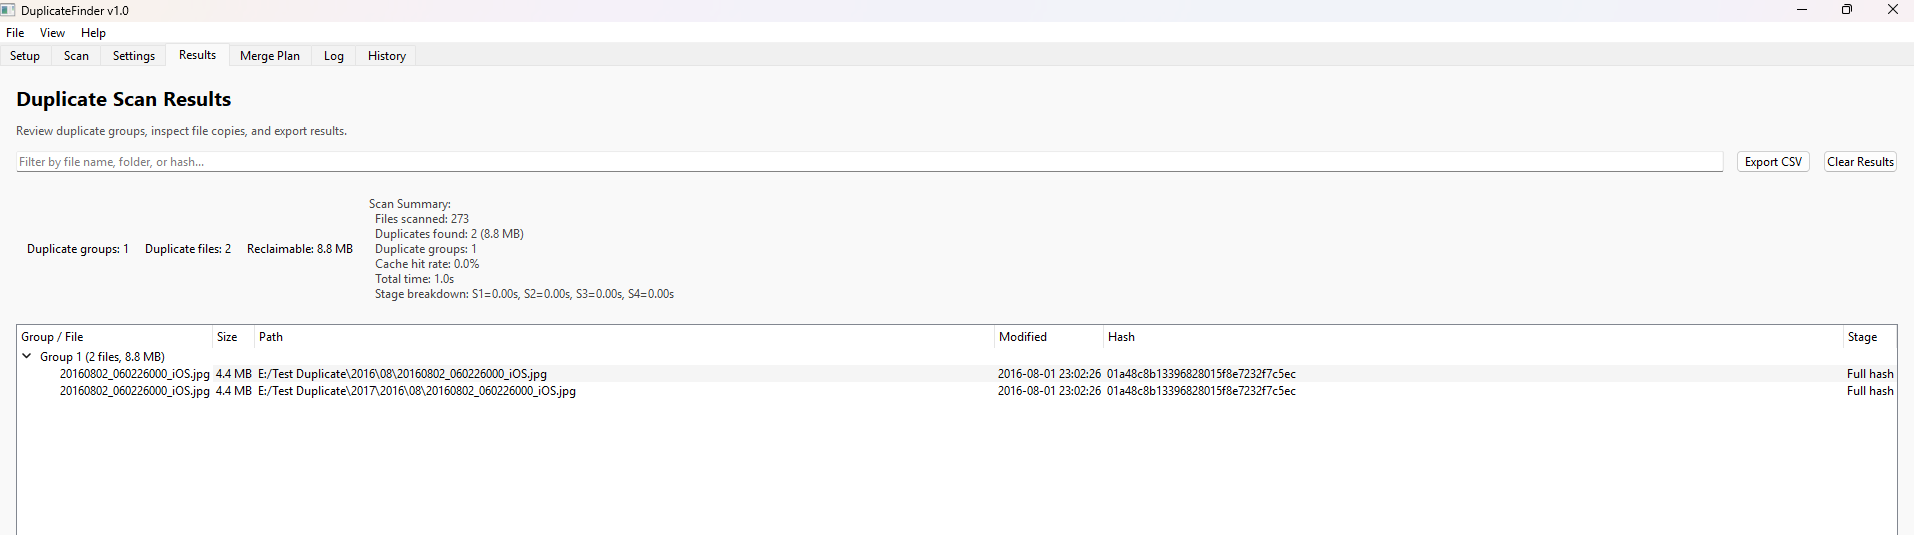
Understanding the tree
Each top-level row is a duplicate group — a set of files whose full content is identical. Expanding a group shows each copy with its full path, size, and last-modified date.
- Wasted space = (copies − 1) × file size. The summary bar shows total reclaimable space across all groups.
- Sort by wasted space, group size, file count, or extension using the column headers.
Context menu actions
- Open file — open with the default application.
- Open containing folder — reveal in File Explorer.
- Exclude from merge plan — remove this file from the upcoming merge plan without deleting it.
- Mark as keep — force this copy to be the winner for its group (overrides the automatic winner selection).
Documents,
cloud-sync folders) before executing the merge plan.
The Merge Plan
Safe, reversible consolidation.
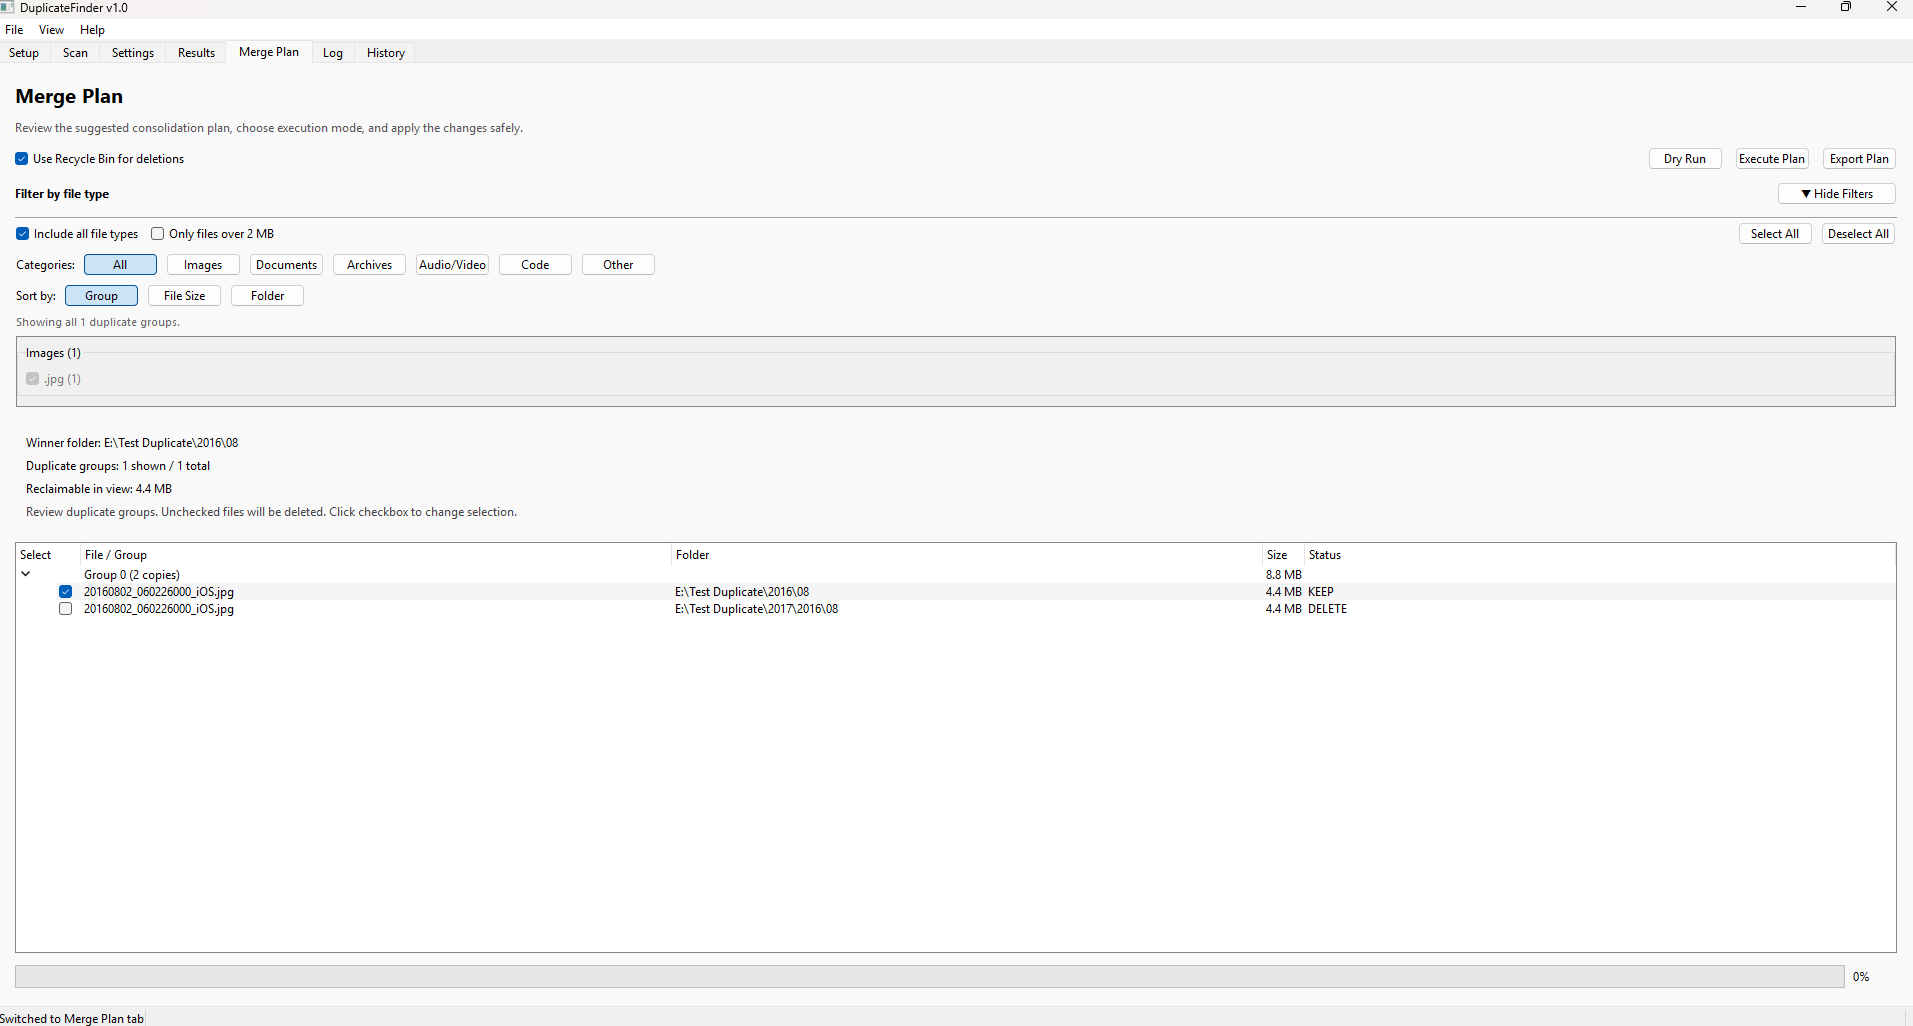
How the winner is chosen
For each duplicate group, the app selects the winner folder — the folder that already contains the greatest number of files. This heuristic keeps the most "organised" folder intact and consolidates stray copies into it. You can override this by right-clicking any file in the Results panel and choosing Mark as keep.
Reviewing the plan
- Each row shows: source path → target (winner) folder → action (Move or Recycle).
- Un-check any row to exclude that file from the run.
- The summary shows total moves, total space freed, and whether any target conflicts were detected.
Dry run
Enable Dry Run to simulate the entire plan without moving or deleting anything. A detailed report shows exactly what would happen. This is strongly recommended the first time you use DuplicateFinder on an important folder.
Executing the merge
Click Execute Plan to start. Progress is shown per-file. Duplicates are sent to the Recycle Bin (not permanently deleted), so you can undo the entire operation from the Windows Recycle Bin if anything looks wrong.
Log Viewer
Real-time diagnostic output.
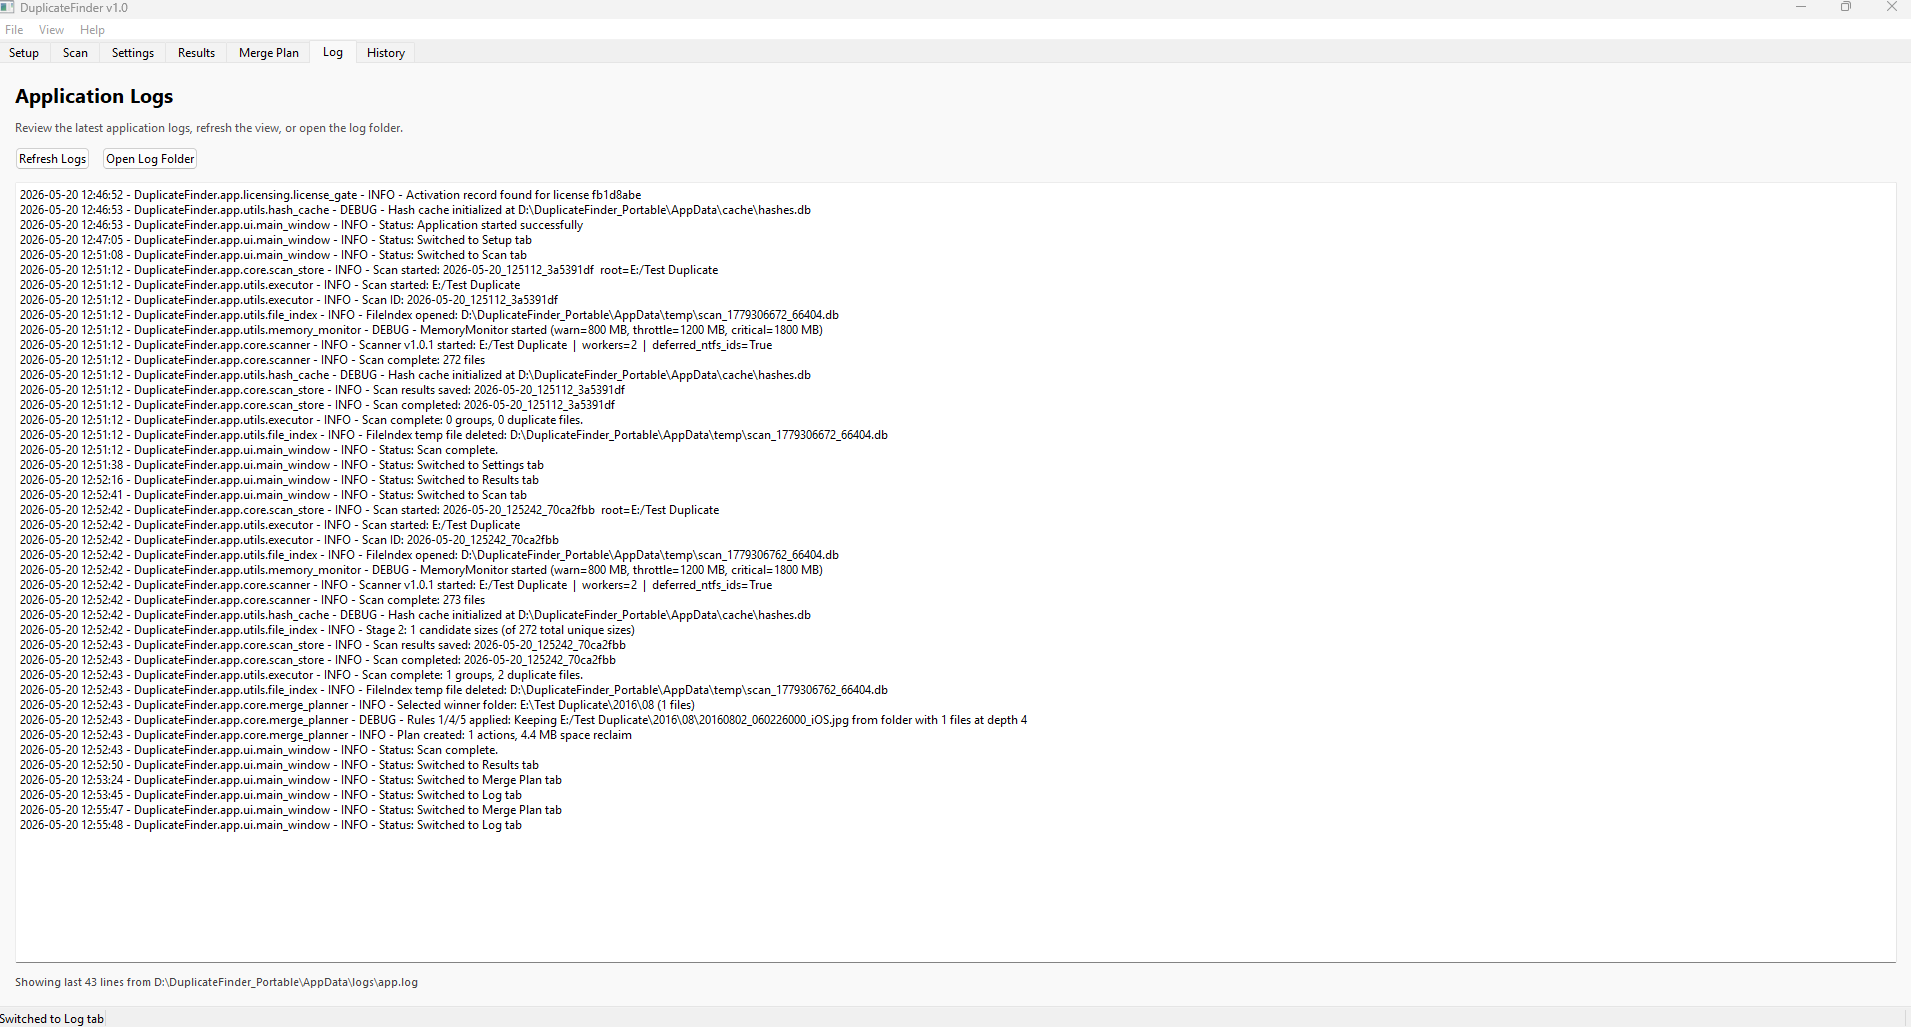
The Log tab streams all application events in real-time. Each entry shows a timestamp, severity level, and message.
Log levels
- INFO — normal operation events (scan started, files indexed, merge complete).
- WARNING — non-fatal issues (permission denied on a folder, a file changed during scan).
- ERROR — failures that may affect results (hash error, failed move operation).
- DEBUG — verbose per-file detail (enable in Settings when diagnosing a problem).
Log files on disk
Logs are written to rotating files at:
%APPDATA%\DuplicateFinder\logs\
Up to 10 daily log files are kept (oldest deleted automatically). If you need to send logs to support, zip this folder and attach it to your email.
Scan History
Browse and reload previous results.
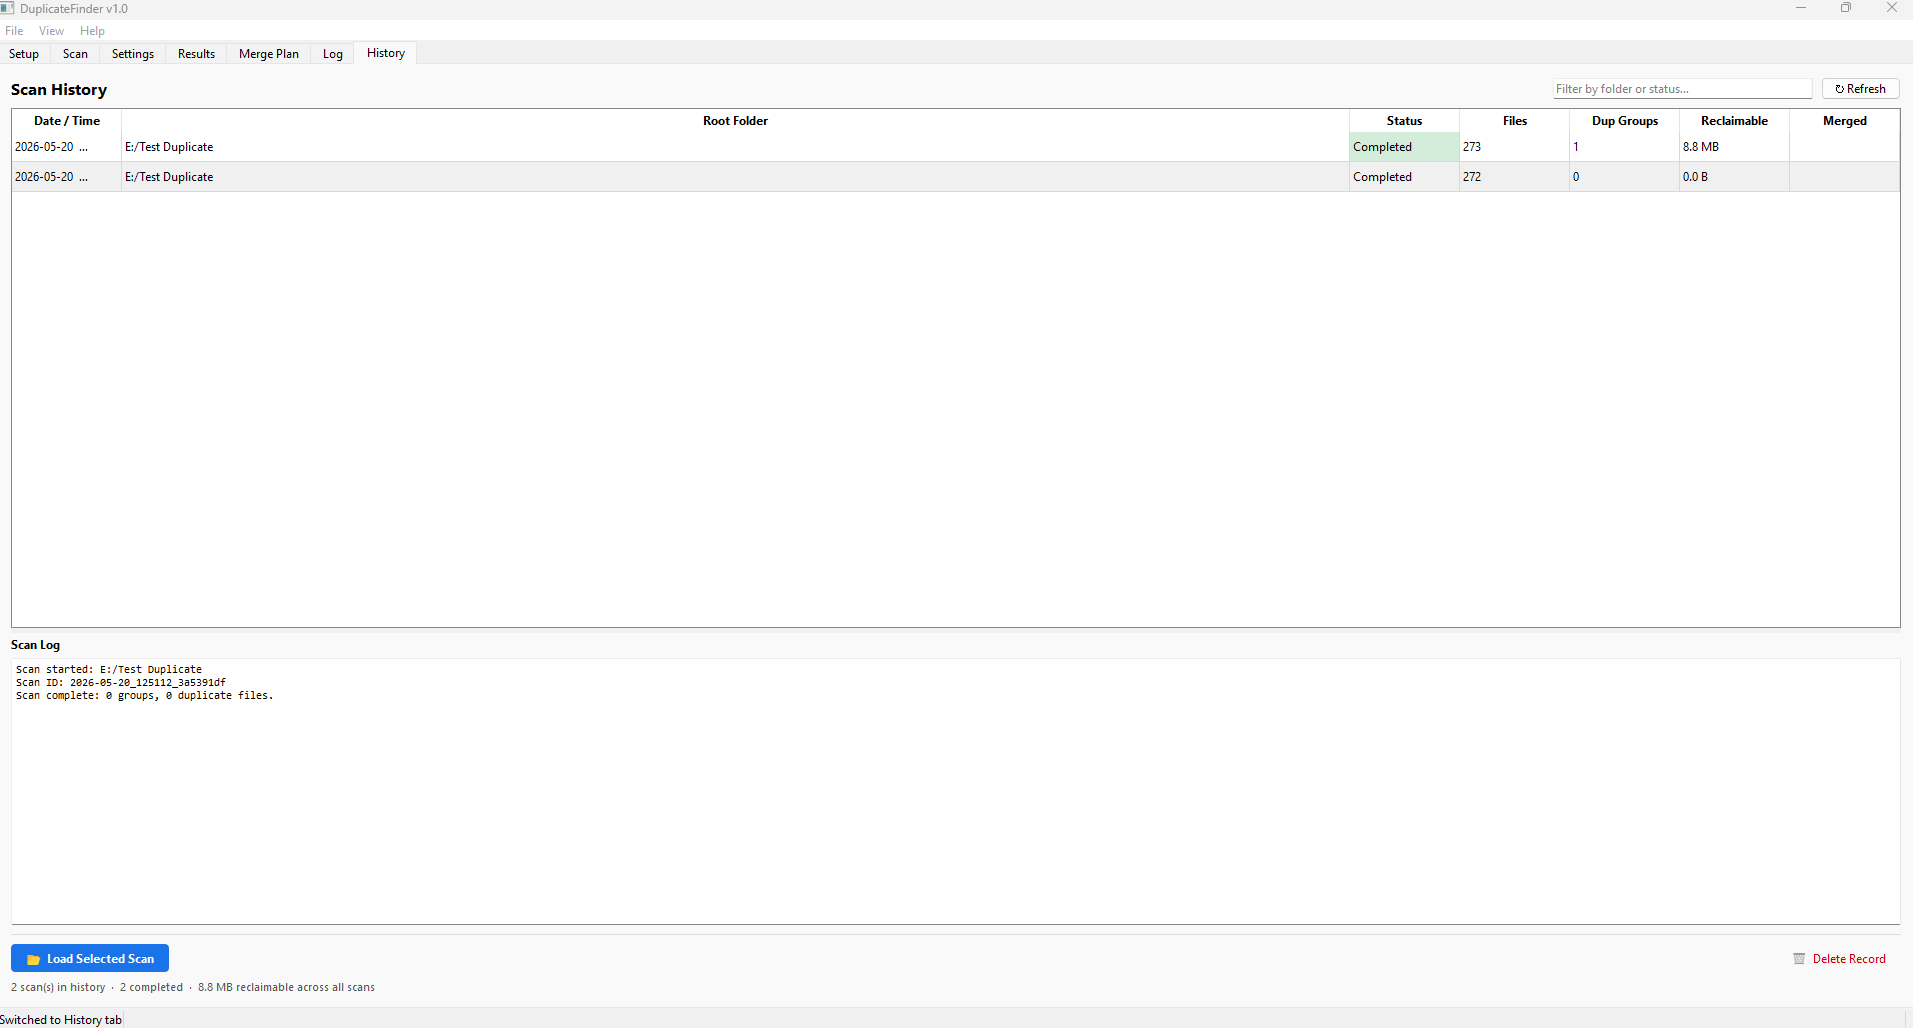
DuplicateFinder automatically saves a summary of every completed scan. The History tab lists them newest-first with: date & time, folders scanned, files indexed, duplicate groups found, and reclaimable space.
Reloading a scan
Double-click any history entry (or select it and click Load) to restore that scan's full results into the Results and Merge Plan panels. This lets you return to a previous scan without re-scanning.
Comparing scans
Use the history list to track progress over time: each run's reclaimable space tells you how much was freed by the previous merge.
Support
If you encounter a bug or need help with activation, email support@azideasolutions.com. Include:
- DuplicateFinder version (shown in Help → About).
- Windows version and build number (
winver). - A brief description of what you expected and what happened.
- The log files from
%APPDATA%\DuplicateFinder\logs\(if relevant).